- 640X480 12 micron Thermal Core
- 60 Hz Refresh Rate
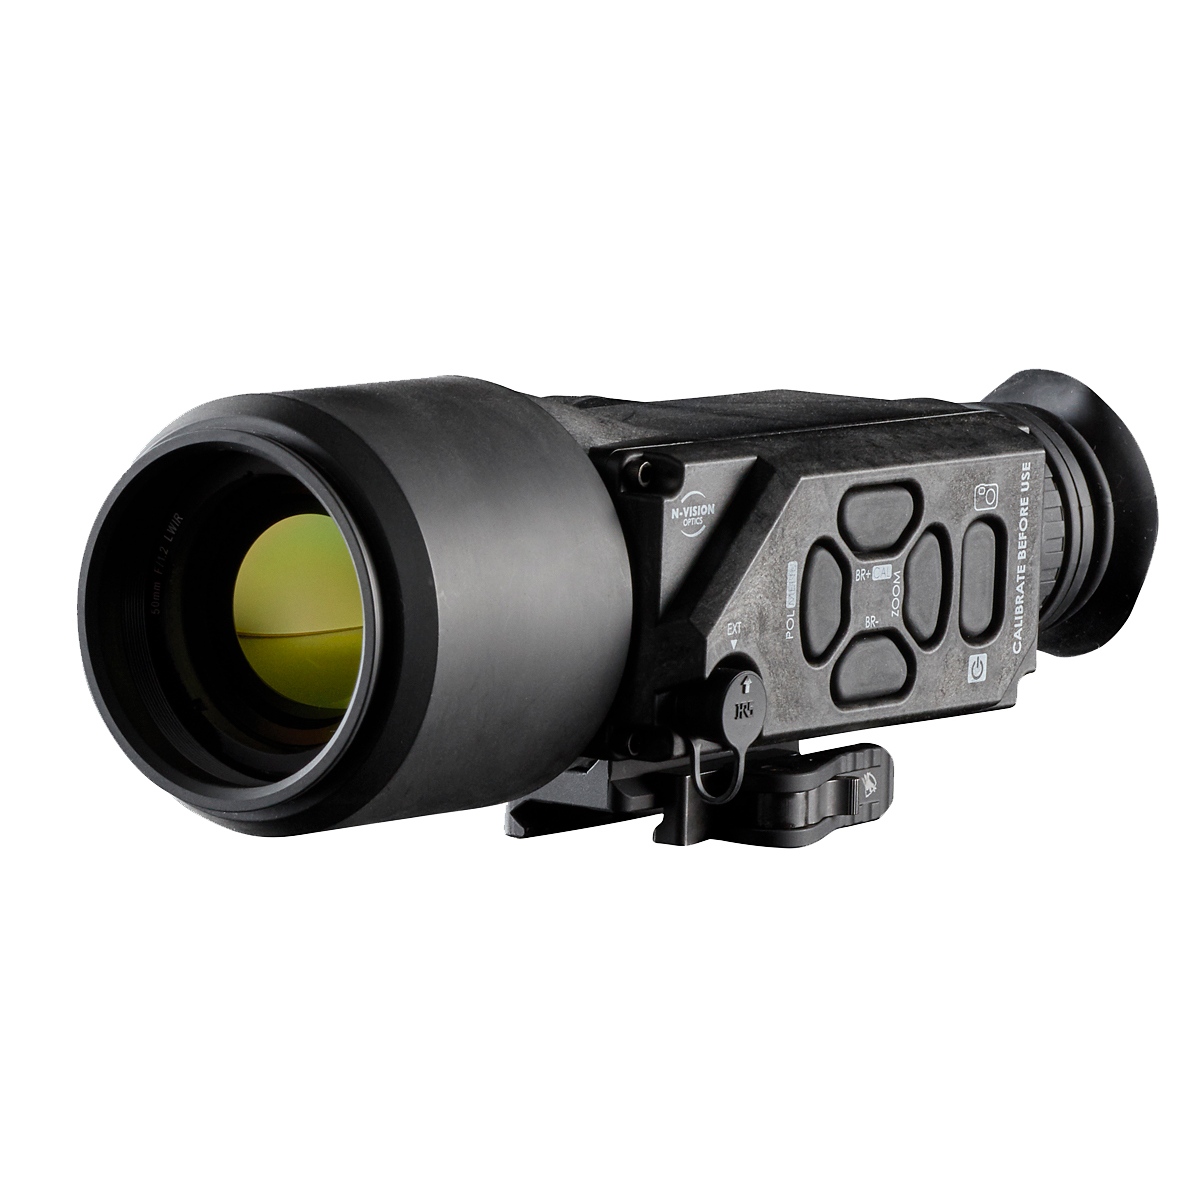
- 50 mm Germanium Objective Lens
- 8 Reticle Options

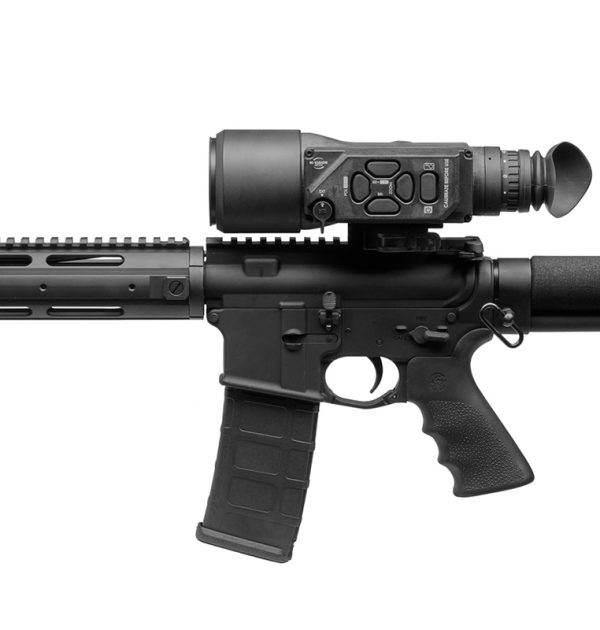
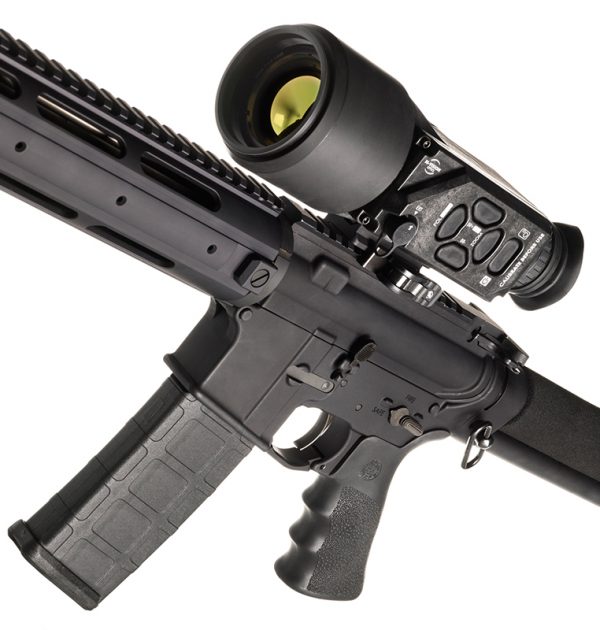
The N-Vision Optics HALO-LR Thermal Scope comes equipped with state of the art 12 micron 640 x 480 thermal sensors offering outstanding image clarity and extended detection ranges. Built with a rugged composite housing and high end anti-reflective (AR) coated, high speed germanium optics, HALO-LR Thermal Scope is the ultimate solution for the serious hunter, operator, or shooting enthusiast.
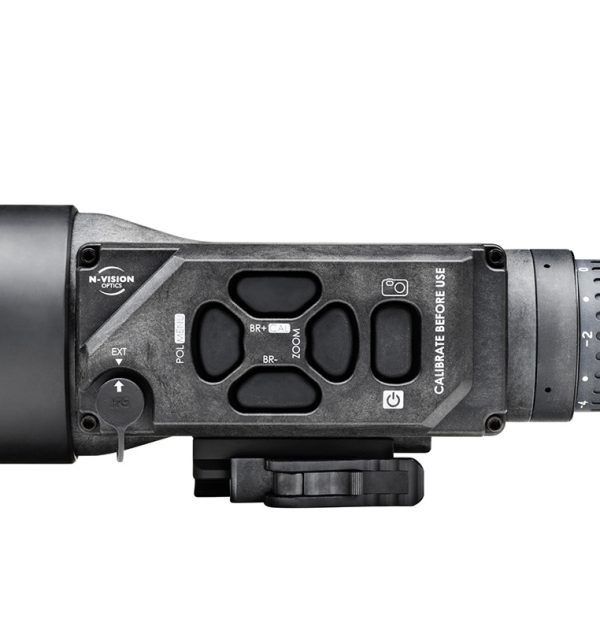
HALO-LR Thermal Scope features long lasting battery life, a waterproof housing, 60Hz refresh rate, digital zoom, and most impressively, unique Region of Interest (ROI) Optimization that enhances image clarity at your point of aim. Unlike comparable thermal scopes, HALO Thermal Scope allows the user to pre-set the desired size of interest in ¼, ½, or full screen modes. Additionally, HALO-LR Thermal Scope supports four unique reticles allowing shooters to customize their shoot by saving multiple reticle options and zeroes. HALO-LR Thermal Scope also provides four advanced polarity modes: white hot, black hot, black edge detect, and white edge detect.
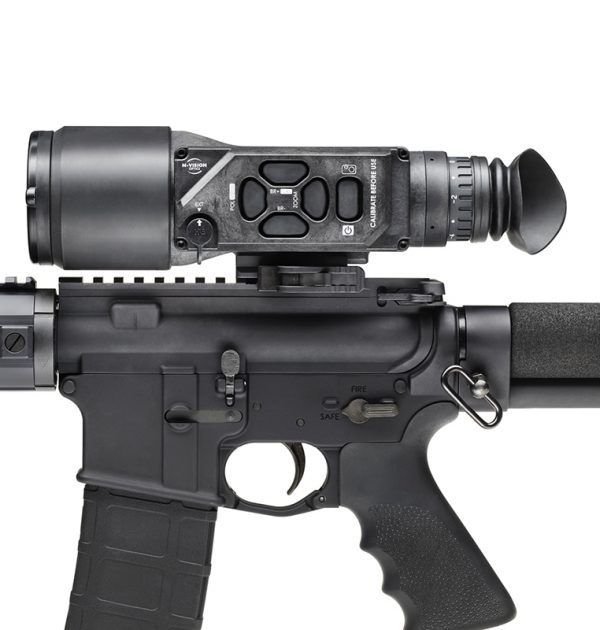
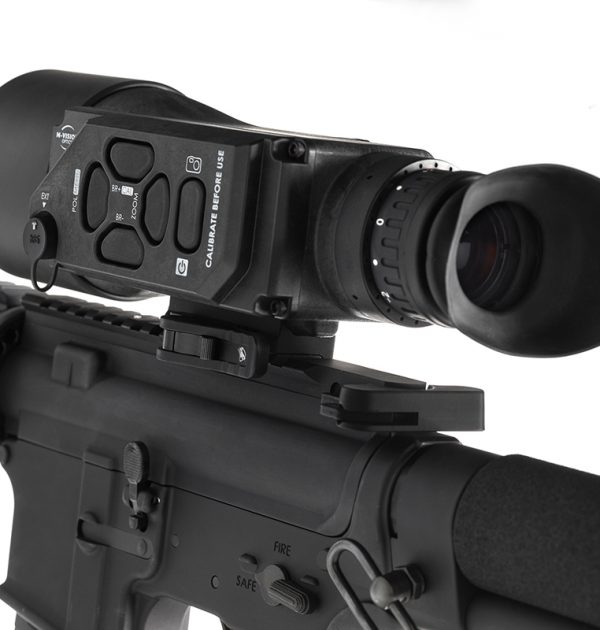
HALO-LR is built with a 50mm F1.2 objective lens offering thermal detection ranges (man sized target) of over a mile. Weighing just 800 g, HALO-LR offers unparalleled detection, recognition, and identification ranges for the long distance shooter.
- Thermal detection ranges of over a mile
- Region of Interest (ROI) Optimization that enhances image clarity at your point of aim
- 4 Advanced Polarity Modes:white hot, black hot, black edge detect, and white edge detect
| Sensor Pixel | 12 um |
|---|---|
| Resolution | 640 x 480 |
| Refresh Rate | 60 Hz |
| Objective | 50mm f1.2 Germanium |
| Field of View | 9 x 7 |
| Magnification | 3.5x |
| Digital Zoom | 1x/2x/4x |
| Display Type | OLED |
| Environment | IP67 |
| Spectral Response | 7.5 um – 13.5 um |
| Dimensions | 8.5L x 3.2W x 3.1H inches |
| Weight | 28.2 oz (800 g) |
| Batteries | 4 CR123 |
| Output | USB or ANALOG |
| Detection range | 2020 yards |
| Recognition range | 726 yards |
| Identification range | 380 yards |
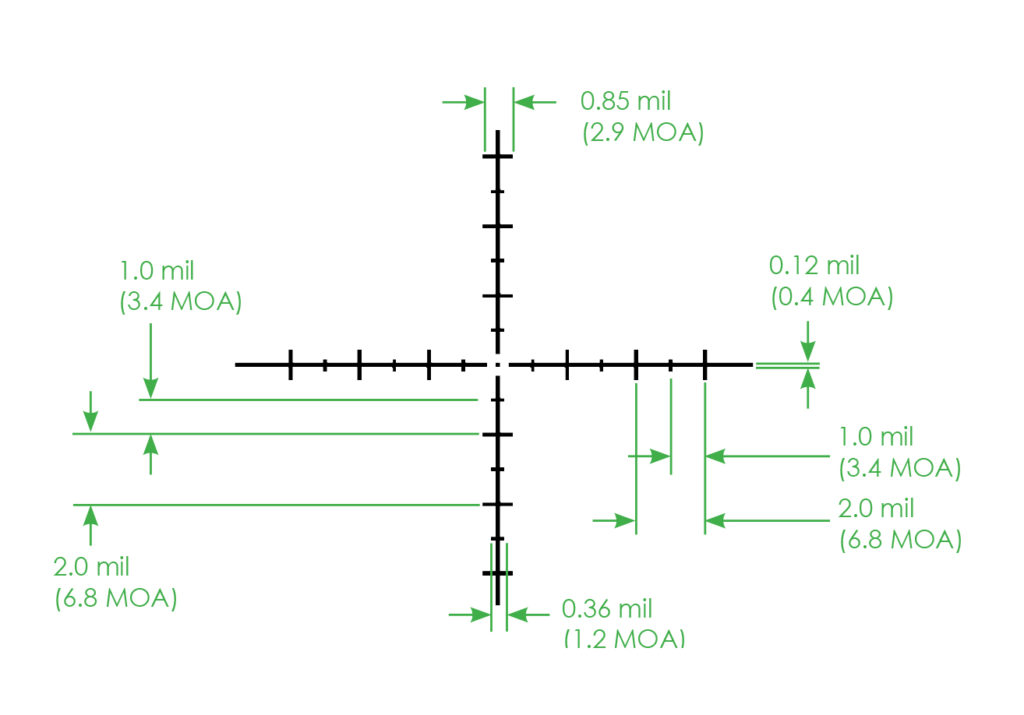
Type 1
At 100 yards, 1x zoom
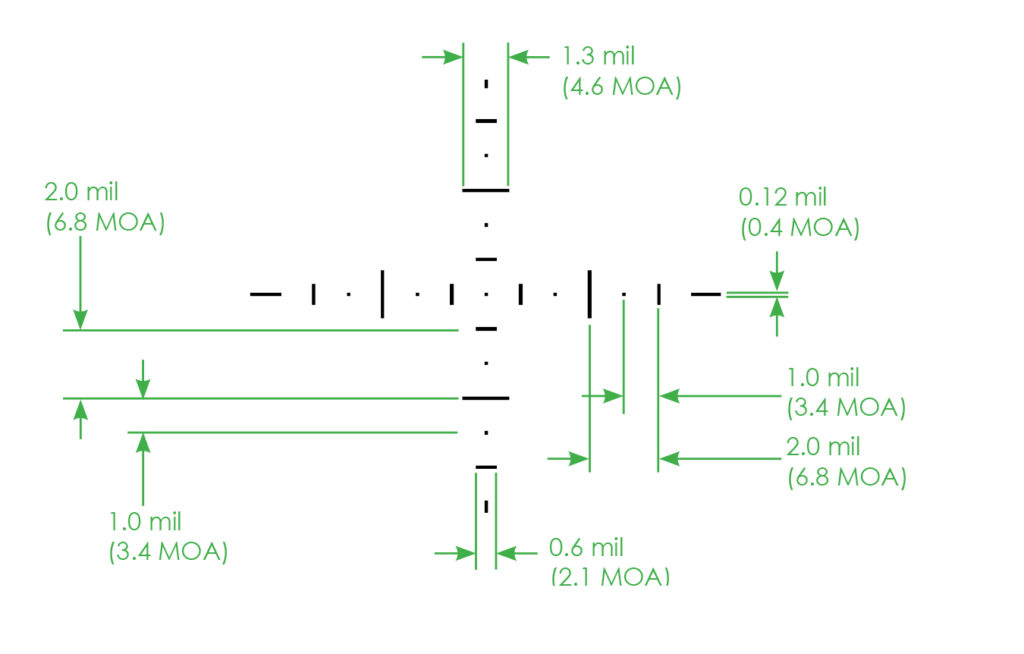
Type 2
At 100 yards, 1x zoom
Type 3
At 100 yards, 1x zoom
Type 4
At 100 yards, 1x zoom
Type 5
At 100 yards, 1x zoom
Type 6
At 100 yards, 1x zoom
Type 7
At 100 yards, 1x zoom
Type 8
At 100 yards, 1x zoom
HALO/HALO-LR TIPS and POINTERS
IMAGE OPTIMIZATION
Based on differing environmental conditions and general user preference, certain measures can be taken to optimize the image seen through the HALO/HALO-LR. All parameters related to image optimization are located in under Menu -> Video Settings.
BRIGHTNESS: Changes the brightness of the display. CE Increasing Contrast Enhancement (CE) helps to distinguish fine image details in low thermal contrast conditions, but setting the value too high will lead to a grainy image. Setting the CE Level between 0- 2 works best for average conditions.
SHARPNESS Increasing image sharpness makes details of the image more pronounced but setting it too high may lead to loss of finer details.
GAMMA Changing the Gamma curve for the display will make the image appear darker or brighter. Gamma does not have any effect on image details. Default value is 1.
ROI Selects the most appropriate Region of Interest (ROI). For scanning, recommended setting ROI to Full. ROI ½ and ROI ¼ leads to the optimization of the image based, correspondingly, on the ½ or ¼ central part of the image. This will make the part of the image that is closer to the center look better but the peripheral parts of the image may become washed out.
CALIBRATION HALO/HALO-LR only supports manual calibration. Calibration is performed by completely covering the objective lens and holding down the CAL button until the image appears to reset itself. The unit has to be calibrated when it is first turned on and later when the image quality degrades during use.
MISCELLANEOUS
FOCUS HALO/HALO-LR scopes do not need to be focused. HALO/HALO-LR’s fixed focus provides high quality imaging in most real-life scenarios without requiring user’s attention.
DIOPTER ADJUSTMENT Adjust the focusing ring to achieve the best possible focus on the display screen. Make sure that the reticle is as sharp as possible.
MULTIPLE ZEROES Users can save up to four reticle positions by selecting one of the Reticle Numbers in the Reticle Menu. Each Reticle Number is saved with its Reticle Type and zeroing information. Performing a manual reset of the HALO/HALO-LR will not affect saved zeroes.
MENU ITEMS VISIBILITY Note that at high values of Contrast Enhancements (CE) and Sharpness settings, menu font may appear dim or blurred. It is recommended to decrease CE and Sharpness settings if this causes issues with clarity. We recommend setting CE and Sharpness values to 0-2 and only change them if it is necessary.
Menu fonts may be hard to read in Edge Detect mode (polarity). It is recommended to enter menu mode while in Black Hot or White Hot.
BATTERIES HALO/HALO-LR takes regular CR123 and rechargeable CR123 batteries. No additional adapters are required for use of rechargeable CR123 batteries. Not all rechargeable batteries are the same and some may not be able to hold recoil of your weapons. Please use reputable battery sources. Remove batteries after use.
EXTERNAL POWER HALO/HALO-LR will work from any external USB power source (power banks/bricks, USB chargers, computer ports, as long as USB output is rated at least 1A).
VERTICAL LINES ON THE SCREEN AFTER THE STARTUP In some very rare cases, the user may observe vertical lines on the screen after the startup. This is related to the inner workings of the thermal imaging core. This is not considered a defect or failure of the system. To clean up the screen, simply cycle through the zoom from 1X to 2X to 4X and back to 1X and vertical lines will disappear.
RESTORE TO FACTORY SETTINGS Occasionally, the user may want to restore the HALO/HALO-LR to original factory settings. In some cases this may help to improve the image quality. To restore the unit, while it is On, press and hold the BR- switch for approximately 15 seconds until the unit turns off (image disappears). HALO/HALO-LR will return to original factory settings upon powering back up.
WARNINGS HALO/HALO-LR are precision optical instruments and it is recommended to treat them with care. Do no scratch optical surfaces. Clean them carefully if contaminated. Do not point thermal imaging devices to a very hot sources such as sun or hot burning fire. This may damage the sensor.
WE ARE HERE TO HELP If you have any questions about your HALO/HALO-LR thermal scope, or need help with configuring or troubleshooting, please contact us. We will be glad to help you get the most out of your HALO/HALO-LR.
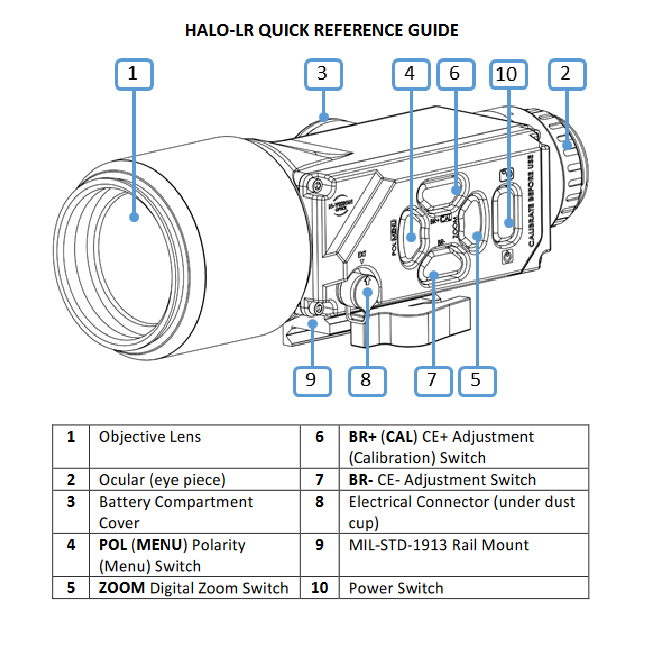
BATTERY INSTALLATION. Unscrew the Battery Compartment Cover (3). Install four CR123 (DL123) batteries into Battery Compartment Cover with all batteries having positive (+) terminals facing out. Close the Battery Compartment Cover (3) and tighten it. Silver colored separator on the Battery Compartment Cover should be facing up when inserting battery compartment back into unit; this is the only way to correctly insert batteries.
POWERING ON/OFF. Press and hold down the Power Button for approximately two seconds. When the display in the Ocular lights up, release the Power button. To turn the unit off press and hold Power button for approximately two seconds until the image in the Ocular disappears.
IMPORTANT: THERMAL CALIBRATION. HALO-LR requires calibration before each use after powering the unit up or after a significant change in ambient temperature, etc. To calibrate the system, ensure the lens cover is closed or the objective lens is completely covered with a hand, etc. Then press and hold BR+ (CAL) for approximately two seconds until image refreshes.
DIGITAL ZOOM (E-ZOOM). E-Zoom is activated by pressing the ZOOM button. The E-Zoom sequence allows the user to select multiple e-zoom factors. When ZOOM button is pressed and released the sight will sequence through 2X then 4X then return to 1X.
POLARITY. Briefly press the POL (MENU) button to change polarity between Black Hot, White Hot and Edge Detect modes. Edge detect modes can be enabled and disabled in the Video Settings menu. Black Hot mode displays the hottest parts of the video as black. The cooler parts are displayed as increasingly lighter shades of gray. White Hot mode displays the hottest parts as white with darker shades of gray until the coldest parts show as black. Edge Detect modes outline regions with the same temperatures in black or white.
CONTRAST ENHANCEMENT (CE). In low thermal contrast, it is often beneficial to be able to increase or decrease the CE level. This can be done by pressing the BR+ and BR- buttons or in Video Settings menu. When CE is set too high for the existing conditions, the image may appear grainy. It is recommended to keep CE level as low as possible.
PHOTOS. Photos can be taken by briefly pressing and releasing the Power button. Photo icon will briefly flash in the upper right corner of the display when picture is taken. For this function to be preset, photos should be enabled in System Settings menu.
MENU. To enter menu system press the POL (MENU) button for approximately two seconds. Navigate between menu items by moving pointer using the BR+ and BR- buttons. Select menu item by pressing POL (MENU) button. When an item is selected, the pointer will change its shape. Value of the selected item is changed with BR+ and BR- buttons.
RESTORATION TO FACTORY SETTINGS. While the unit is On, press and hold BR- for approximately 15 seconds until the HALO turns Off.